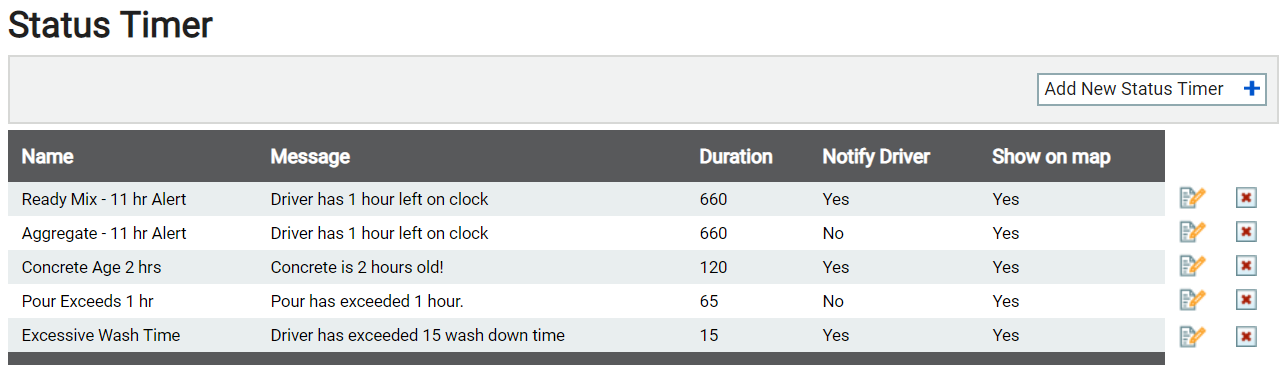
Settings > Status > Status Timer
Tracking time that has passed across multiple statuses is done through the use of statusThe specific activity or task a driver is currently engaged in, typically as part of a process called a "status loop." timers. These function much like a stopwatch, automatically starting when one status trigger occurs and then stopping after another trigger occurs. This functionality is most often used for tracking DOT requirements like hours of service or mandatory breaks.
With these status timers in place, you may track delivery times for perishable materials, notify administrators when thresholds are exceeded, and force status changes after a threshold is exceeded.
Adding a status timer
Based on your objective, creating a status timerThreshold timers associated with a status or status loop that regulate the expected amount of time a driver should spend performing an activity, such as pouring on a job or washing after emptying a load. can help in monitoring details from shift times to loadThe total amount of concrete or asphalt that is being or has been batched for delivery. age. The typical timer consists of a status that triggers the start of a timer and then a status that ends the timer. This ensures a full loop of activity tracking to time only relevant statuses.
|
The type of statuses to filterA search tool that restricts data queried based on factors like equipment type, employee groups, and date ranges. against when setting timers for each status. This determines which status you may select from the Timer EventEngine data recorded by TrackIt that includes fault codes and driver behaviors like hard braking. tab. |
Timer Event tab
|
The name of the status timer. This should describe the timers associated, as multiple statuses may be assigned to each timer. |
|||||
|
The total amount of time to elapse before the timer triggers a notificationA software-generated message or warning triggered by vehicle data.. We recommend using the Action Time and Action settings to affect when to start and stop the timer so that only times associated with the desired work type will accrue. |
|||||
|
The desired status intended to trigger starting or stopping the timer. Multiple statuses may be assigned toward a timer. |
|||||
|
The moment to trigger a timer action. This must be used in tandem with the Action setting.
|
|||||
|
The triggering behavior for the timer. We recommend having at least one status that triggers the start and another status that triggers stopping the behavior.
|
Timer Notifications tab
|
The timer event that triggers when a notification should be sent to the email group.
|
|||||||
|
The image associated with the message indicates its priority in the recipient's inbox. |
|||||||
|
The messageText messages exchanged between drivers and dispatchers using TrackIt. associated with the timer. This should be informative based on the type of timer, such as if a worker has one hour left on the clock. |
|||||||
|
The driver is also included on the list of recipients when a notification is triggered.
|
|||||||
|
The vehicleAll machines used as a means of production on a construction site or at a batch plant. icon is replaced with the Priority icon on the Equipment Map screen when the triggering event occurs.
|
|||||||
|
The status the driver is automatically changed to when the status timer is triggered. This is often used to move a driver to a status like Last Load when nearing the end of a work shift.
|
|||||||
|
Send any status change data to integrated batching systems. This requires that the Status Change field be set, as this is the data supplied to any third-party applications.
|


- Navigate to Settings > Status > Status Timer.
- Click the Add New Status Timer
 button to create a new timer, or click the Edit
  button to change an existing status.
 - Provide a Duration (min) that will act as the total time to elapse before a notification is generated.
- Click Add Row
 .
. - Select the desired Status, Action Time, and Action. Repeat this for additional statuses if you want a status triggering the start and stop timers.
- From the Timer Notifications tab, enter a Message to use as the notification.
- If you wish for the driver to also receive the message, select Notify Driver.
- Click Add Email Group
 and select the desired recipients for this notification.
 - Click Save & Close
 .
.