Dispatch > Equipment Map
Dispatchers need a bird's eye view of their fleet to effectively monitor jobA project that orders and tickets are grouped under. progress and track driver locations throughout the day. This screen utilizes Google Maps with added functionality to display vehiclesAll machines used as a means of production on a construction site or at a batch plant. tracked via GPS modules and other tracking devices.
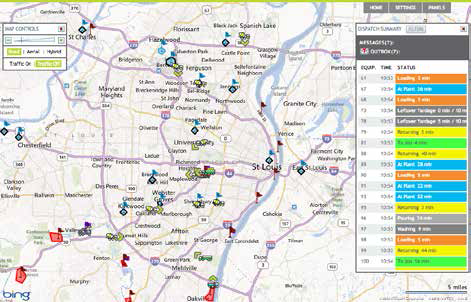
The upper-right corner of the Equipment MapA map view that tracks the locations and statuses of individual equipment in a fleet. The dispatcher's equivalent to a "bird's-eye view." provides the Home, Settings, and Panels tabs. Selecting Home brings you to the TrackIt Web Console home page, and the Settings and Panels tabs provide more use options for the map.
Settings
Map Options
This pane allows you to set filters that hide or display specific objects like hotspots, plants, equipmentAll machines used as a means of production on a construction site or at a batch plant. types, and more.
 button on the pop-up window.


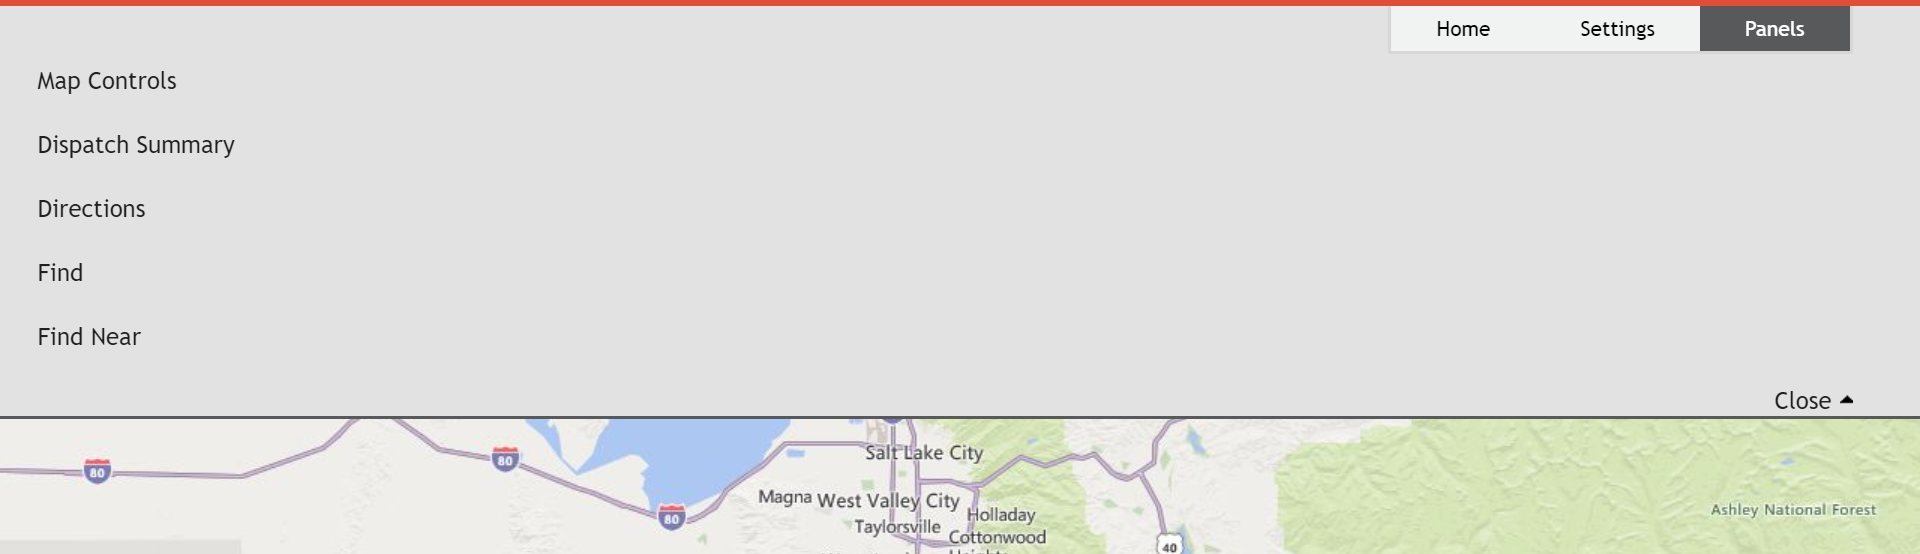
Panels
Selecting the Panels tab at the top presents a list of panels with additional functionality available for the dispatch mapA map view that tracks the locations and statuses of individual equipment in a fleet. The dispatcher's equivalent to a "bird's-eye view.". These panels are:
- Map Controls (default)
- Dispatch Summary (default)
- Directions
- Find
- Find Near
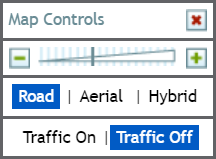
Simple navigation and map view appearance is controllable here via zoom, view type, and traffic toggling.
|
Zoom |
Zooms in or out on the map using the map controls. |
|---|---|
|
View Type |
Configures the map displayed based on ROAD, AERIAL, and HYBRID detail levels.
|
|
Traffic Conditions |
Provides option to show the current traffic conditions based on Google's algorithms.
|
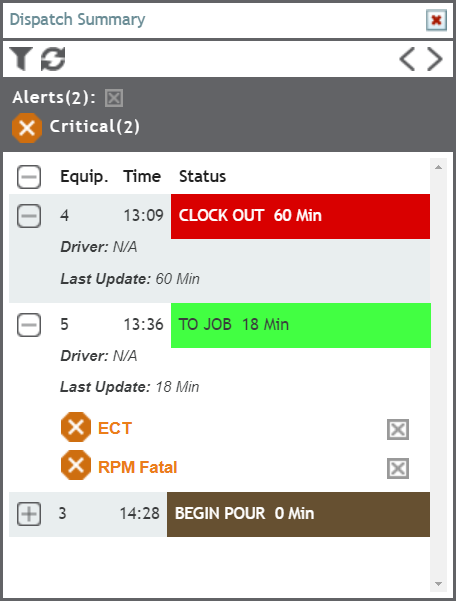
This dialog windowA pop-up window that requires user input. includes details such as individual alerts triggered for the vehicleAll machines used as a means of production on a construction site or at a batch plant., ticket information, assigned driver, and time since last update.
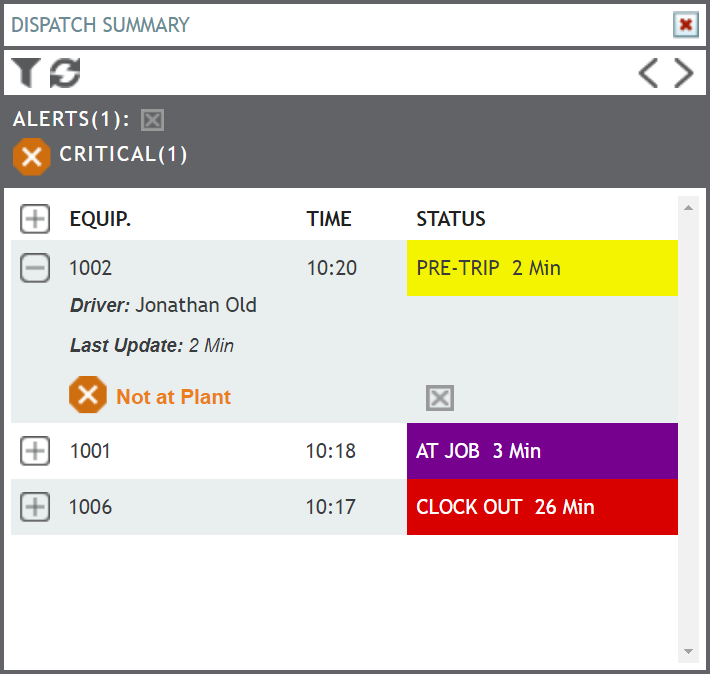
- To set filters for vehicles, click the Filters
 button in the top-left corner of the panel.
 - To refresh vehicle states, click the Refresh
 button in the top-left corner of the panel.
 - To view vehicle information, click the Expand

 button next to a vehicle entry.
 - To reduce vehicle information, click the Collapse

 button.
 - To acknowledge an alert, click the Acknowledge Alert
 button.


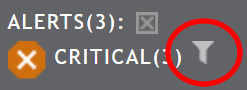
Filtering alerts & messages
Both unacknowledged alerts and messagesText messages exchanged between drivers and dispatchers using TrackIt. may be filtered against in the Dispatch Summary dialog window. Using a filterA search tool that restricts data queried based on factors like equipment type, employee groups, and date ranges. simply entails clicking on the desired icon type. The full alertA software-generated message or warning triggered by vehicle data. messageText messages exchanged between drivers and dispatchers using TrackIt. will display next to the icon indicating the type of alert.
|
|
Critical Alert |
|
|
Important Alert |
|
|
Informational Alert |
|
|
Inbox |
|
|
Outbox |


- At the head of the Dispatch Summary dialog window, click on the alert type you wish to see for all logged-in vehicles. Any equipment without the selected type is removed from the list. A filter icon will appear next to it to indicate that a filter is set.
- To disable the filter, click on the alert icon once more.
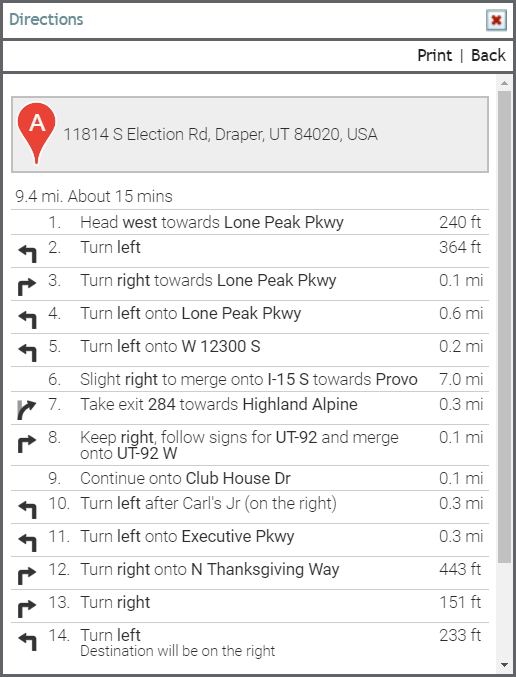
To review map navigation, the Directions pane allows you to identify an address, hotspotGeographic areas marked on a map that act as destinations for driver navigation or triggers for automated behaviors in TrackIt., or coordinates for start and end locations.
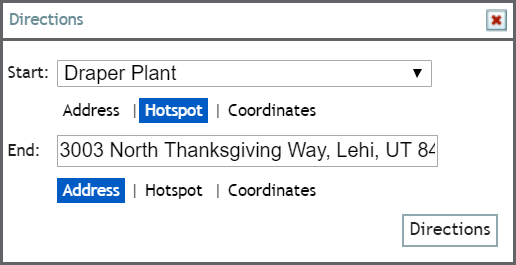
- Click the Directions link in the Panels tab.
- In the Directions panel, enter in a Start location using an Address, Hotspot, or Coordinates.
- Enter in an End location using an Address, Hotspot, or Coordinates.
- Click the Directions
 button. This not only highlights a route on the map view, but also displays step-by-step directions.

To save time on visually scanning your map, the Find option allows you to identify a location, hotspot, piece of equipment, or coordinates to focus on. When used, a red location marker  will appear at the found location.
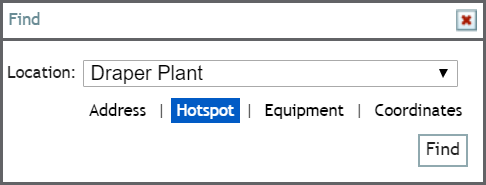
- Click the Find link in the Panels tab.
- In the Find dialog window on the map, select what you would like to search for.
- If Address, enter in the most exact address.
- If Hotspot, select a hotspot from the drop-down menu.
- If Equipment, select the equipment number from the drop-down menu.
- If Coordinates, enter in the latitude and longitude.
- Click the Find
 button to find the location. A red location marker
  appears at the desired location or equipment.

The Find Near dialog window allows you to identify equipment types within a geographic location. This can help simplify the view for dispatch when a few different types of equipment are present at a job site.
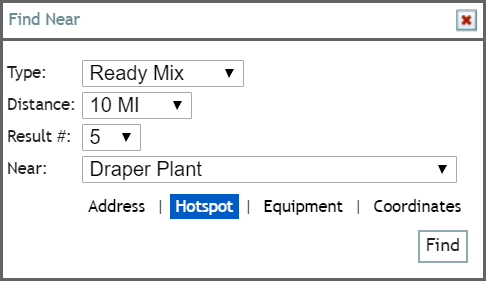
Results meeting your find criteria will appear on a new Find Near dialog window to the right, along with the equipment's distance from the location and current status. On the map, all hotspots will remain, but only the vehicles fitting the find filter will appear on the map in their respective locations. A red location marker will mark the Near address . After one minute, the map will return to its normal view with the red location marker still present.
- Click the Find Near link in the Panels tab.
- In the Find Near dialog window, select the Type of equipment.
- Select a Distance to limit the search radius.
- In the Near field, enter in an Address, a Hotspot, Equipment, or Coordinates.
- If Address, enter in the most exact address.
- If Hotspot, select a hotspot from the drop-down menu.
- If Equipment, select the equipment number from the drop-down menu.
- If Coordinates, enter in the latitude and longitude.
- Click the Find button to show the equipment fitting your criteria. Additionally, a red location marker will pinpoint the address or coordinates you searched for.
Interacting with employees & equipment
From this screen, in addition to Employee Dispatch and Equipment Dispatch screens, site users can interact with drivers and equipment via rollover buttons.
Rolling over a vehicle icon with a cursor on the Equipment Map screen (or the employeeUser accounts for drivers, dispatchers, and other staff to perform varying functions in TrackIt. or equipment number from the Employee Dispatch and Equipment Dispatch screens) displays a dialog window with vehicle-specific data. Click the equipment icon to retain the window and display rollover buttons.
If the customer has installed the COMMANDassurance ProbeA probe device mounted in the side of a bin to measure the moisture content of aggregate materials such as sand. or TrackIt Delivery Cycle Monitoring on any vehicles, the rollover can display information retrieved from either sensors. Administrators can change these fields by going to and selecting the Hotspot/Map tab. Admins can then select the Edit Vehicle Rollover  button to begin editing the rollover fields that will display on the map.
In addition to equipment data, the equipment dialog window displays rollover buttons. Each button allows you to perform quick actions, view condensed reports, or interact with drivers.
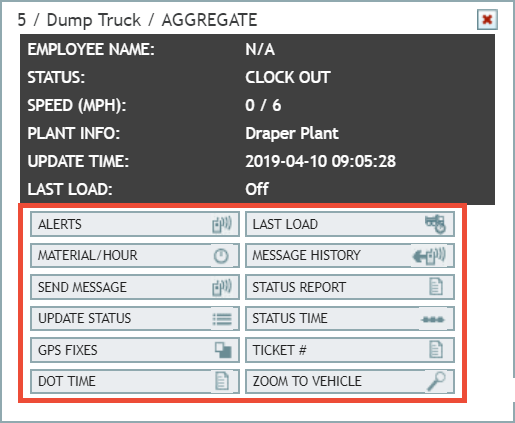
The information displayed for each vehicle rollover button is described briefly below.
| Button Name | Button Description |
|---|---|
| Alerts | Displays all alerts triggered by this vehicle or employee. |
| Daily Clock Time | Displays the Daily Clock Time Report with hours an employee has clocked for that day. |
| DOT Time | Displays a small report indicating the number of hours spent driving that will be reported for DOT purposes, similar to the Hours of Service report. |
| Engine Events | Displays a small report of engine events reported for that employee or equipment. Each occurrenceA single incident or event recorded by TrackIt. has details listed like the Engine EventEngine data recorded by TrackIt that includes fault codes and driver behaviors like hard braking. Breakdown report. |
| GPS Fixes | Launches the GPS Fixes report to play portions of a drivers day, and shows users a recording of the driver as they move around the map. |
| Last LoadThe total amount of concrete or asphalt that is being or has been batched for delivery. | Alerts drivers that they are on their last load of the day. This automatically sets a timer once the driver enters an At Plant or At Yard status. |
| Manual Login | Performs a log in action without any interaction needed from the TrackIt Android app. |
| Manual Logout | Forces the log out action on a driver's tablet without any interaction needed from the TrackIt Android app. |
| Material/Hour | Displays a small report for the equipment identifying the total number of trips, material carried per trip, and material divided by the amount of time, similar to the Material Per Hour report. |
| Message History | Displays a brief history of messages sent between this driver and dispatch, similar to the Message History report. This includes who sent the message, what status they were in, and timestamps for when the message was sent and received. |
| Question Report | Displays a small report with all questions sent to a driver and the responses they returned. |
| Send Message |
Displays a simple dialog window to create a Text, Canned, or Question message and send it to that employee or equipment specifically. Create Canned messages from the Messages page. |
| Status Report | Displays a condensed Status Breakdown report to show the each status the selected employee or equipment has been in throughout the day and how much time they spent in each status. |
| Status Time | Displays a condensed Status Time Summary report breaking down each status the equipment or employee has entered, how many times they've been in that status, and then times in minutes that they've spent in that status. |
| Ticket # | Shows all relevant ticket information regarding the selected employee or equipment. From this dialog window, you can manually change tickets, end a ticket if unplanned changes occur, and edit destinationThe location of a job or pour site that a driver must navigate to. hotspots if necessary. Editing a destination will affect all other tickets associated with that job. |
| Update Status | Displays a dialog to manually update the status of a driver or equipment. |
| View in Map | Launches the Equipment Map screen on a separate browser tab. This button is only viewable on the Equipment Dispatch screen. |
The buttons shown for equipment and employees are controlled from the Hotspot/Map tab of the Site Settings screen.
- Navigate to Dispatch > Equipment Map.
- Right click your mouse over the location on the map for which you want details.
- Select the LOCATION DETAILS
 button at the bottom of the pop-up pane. The Location Details pane will appear to the left with the location's latitude and longitude.
 - Click Get Address
 to generate the street address for your location.


- Navigate to Dispatch > Equipment Map.
- Right-click on the desired section of the map and click CREATE A HOTSPOT
 .
. - Left-click on an area of the map to designate as the center of the hotspot. The boundaries of the geofenceGeographic areas marked on a map that act as destinations for driver navigation or triggers for automated behaviors in TrackIt. can be changed at a later point, so this is not a permanent action.
- Provide a Description, Shape, Type, and Size.
- Click Save
 .
.


To change a hotspot to a polygon shape
- Click on the icon indicating the center of the hotspot, and then click EDIT
 .
. - Select the Shape drop-down menu and pick Polygon.
- Click Save .
- Click on the hotspot's center icon again and this time select ADJUST SHAPE
 .
. - Click and drag the points at each corner to adjust the shape of the geofence. Click along the blue lines to add more points to manipulate.
- Once you're done adjusting the hotspot, click Save .


- Navigate to Dispatch > Equipment Map.
- Click the equipment icon for the vehicle you wish to send a message or the status of the vehicle in the Dispatch Summary screen.
- Select the TICKET #
 button.
 - In the Ticket # dialog window, select the Edit Destination Hotspots
 button.
 - From the Edit Destination Hotspots dialog window, choose the current hotspot by selecting it from the Assigned column.
- Click the left arrow
 button to remove the selected hotspot.
 - Choose the desired hotspot from the Unassigned column and move it to the Assigned column with the right arrow
 button.


- Click Save to return to the Ticket # dialog window.
- If you're using the Equipment Dispatch screen:
- Click the Last Load
 button. Then continue to step #3.
- Click the Last Load
- If you're using the Equipment Map screen:
- Pick a vehicle by clicking on the equipment's
 icon. The vehicle rollover dialog window appears.
 - From the rollover action list, click the LAST LOAD
 button.
If this action is not present on the rollover list, you may add it via the Dispatch Vehicle Rollover option on the Site Settings screen. - Pick a vehicle by clicking on the equipment's
- On the Last Load dialog window, enable and set the options as needed.
- Click Save .


- Navigate to Dispatch > Equipment Map.
- Click the equipment icon for the vehicle you wish to send a message or the status of the vehicle in the Dispatch Summary screen.
- Select the UPDATE STATUS
 button from the pop-up dialog screen.

 button to show more drop-down menus with equipment selection options. Select the Hide
  button to add any selected equipment to the status change and to show the previous dialog screen layout.
- From the Status drop-down menu, choose which status you would like to update the status to.
- Check Sent to Interface if you want to send the status change to an interfacing system.
- Click Save to finish updating the status.l
- Click the equipment icon for the vehicle you wish to send a message or the status of the vehicle in the Dispatch Summary screen.
- Select the SEND MESSAGE
 button.
 -
If you want to choose different pieces of equipment to receive your message, select the Modify
 button to show more drop-down menus with equipment selection options. Select the Hide
  button to add any selected equipment to the message and to show the previous dialog screen layout.
 - Select the Message Type from the drop-down menu.
- If you choose Text, enter your unique message in the Message field below.
- If you choose Canned, select the pre-written message from the drop-down menu that appears below.
- If you choose Question, select the type of question using the radio buttons
 underneath your Message field. Depending on which type of question you choose, the message and response will change.
- When done, click the Send
 button to send the message.


