Settings > Employee > Employee
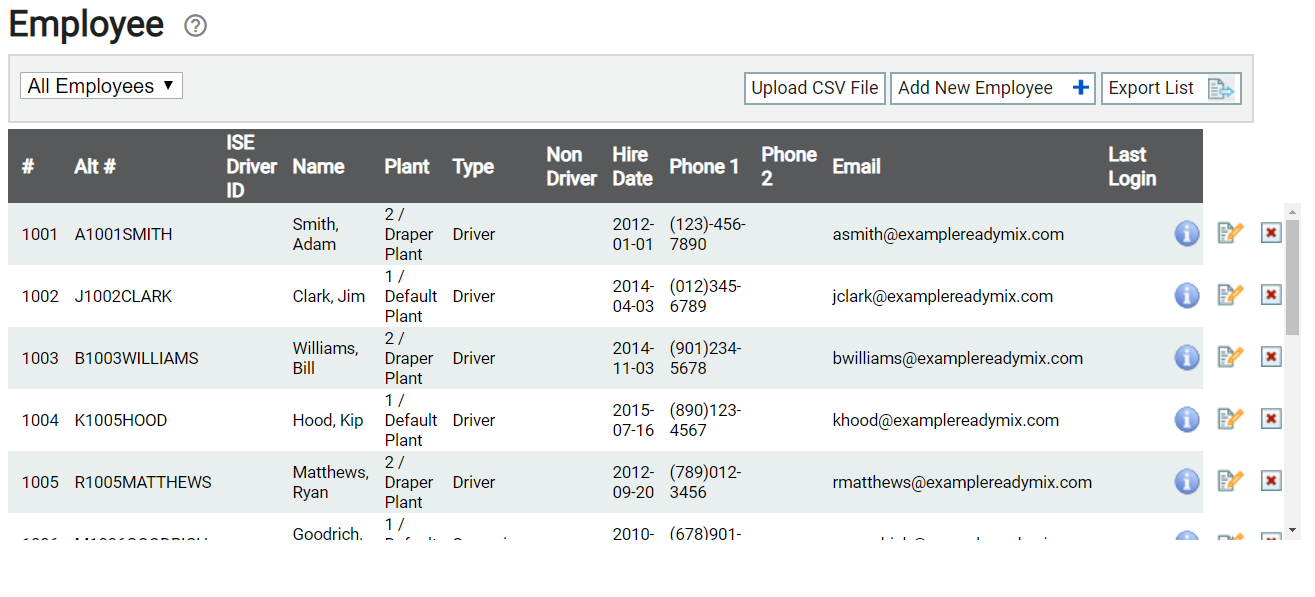
While TrackIt isn't intended as an employeeUser accounts for drivers, dispatchers, and other staff to perform varying functions in TrackIt. management system, it does offer numerous features to create and track your drivers and dispatchers, give access to the TrackIt Android app, handle hours worked and payroll, receive email and text messagesText messages exchanged between drivers and dispatchers using TrackIt., and assign vehiclesAll machines used as a means of production on a construction site or at a batch plant..
Structuring column data for an import
Performing a bulk upload entails that you use a properly-formatted CSV file. This file should consist of individual columns for each data type with each row containing the data for an individual employee entry.
| Example employee import file |
Each column should be labeled based on the following drop-down values.
| Column Name | Example Data | Required? |
|---|---|---|
| Employee Number |
1007 |
Yes |
| Alt Employee Number |
007 |
|
| DOT and DVIR Driver ID | 137A | |
| DOT Solution | VisTracks | |
| First Name | Jose | |
| Last Name | Prada | |
| Employee Type | Driver | Yes |
| Hire Date | 2016-08-09 | Yes |
| Acquired Hire Date | 2018-06-13 | |
| PlantA production plant or material storage location. Number | 2018-11-27 | |
| Plant Description | Default Plant | Yes |
| Phone 1 | (678) 901-2345 | |
| Phone 2 | (678) 901-2345 | |
| jprada@example.com | ||
| Last Login | 2019-07-15 09:38:31 | |
| Time Zone | US/Mountain | |
| WebLogin | true |
- Navigate to Settings > Employee > Employee.
- Select the Upload CSV File
 button on the right.
 - Click Browse... to select the desired CSV file.
- Select the file to import and click Open.
- Click Upload to complete the import. If the upload was successful, a dialog windowA pop-up window that requires user input. appears to indicate its completion.
- Click OK to close the dialog. The employee list updates with the newly-added records.
Adding an employee
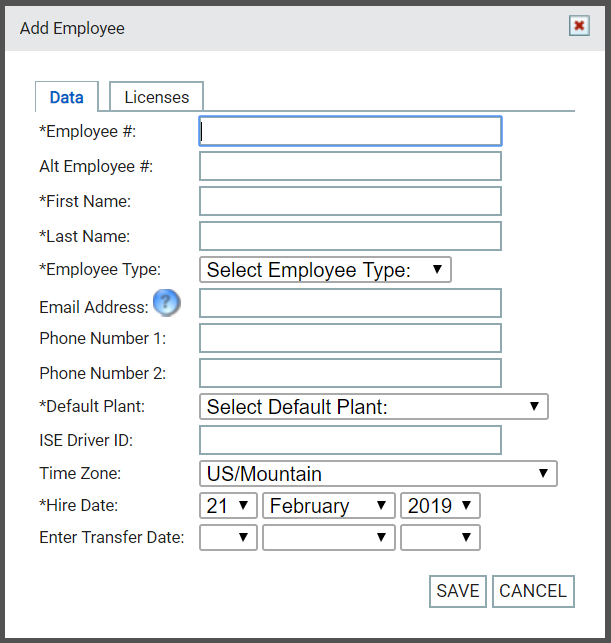
- To create a new employee, click Add New Employee
 . The fields below describe the options available.

Add Employee dialog window
|
The employee's internal company identification number. |
|
|
The employee's secondary company identification number, often a payroll code for integrated solutions. |
|
|
The employee's first given name. |
|
|
The employee's surname. |
|
|
The employee's default or designated jobA project that orders and tickets are grouped under. type, such as Driver or Dispatcher. This is used for payroll purposes to handle pay rates based on the work an employee performs. |
|
|
The employee's email address or text messagingText messages exchanged between drivers and dispatchers using TrackIt. address for receiving TrackIt-generated alerts, messages, and notifications. |
|
|
The phone number for contacting the employee as needed. This is kept for reference purposes. |
|
|
The plant an employee uses most often as the originThe source or "home" location equipment departs from when en route to a destination. This is typically a plant or yard. for receiving loads. |
|
|
The employee's ID as used for ISE eFleetSuite integrationAllows different software solutions to exchange information without the need for manually exporting or importing data.. This is needed when DVIR licensing is enabled for your company. |
|
|
The default time zone an employee works in. This affects the time shown for then when logged into the TrackIt Android app. |
|
| Hire Date |
The date of an employee's hiring with the company. |
| Enter Transfer Date |
The date an employee was moved to work in a new area or plant at a company. |

- Navigate to Settings > Employee > Employee.
- Click Add New Employee . If you have a spreadsheet containing multiple employee entries, click the Upload CSV File button and browse for your file.
- Enter any necessary information to give them access to TrackIt.
- Click Save
 .
.

The employee may now log in on the TrackIt Android app, TrackIt Web Console, or employee web portal depending on their Employee Type.