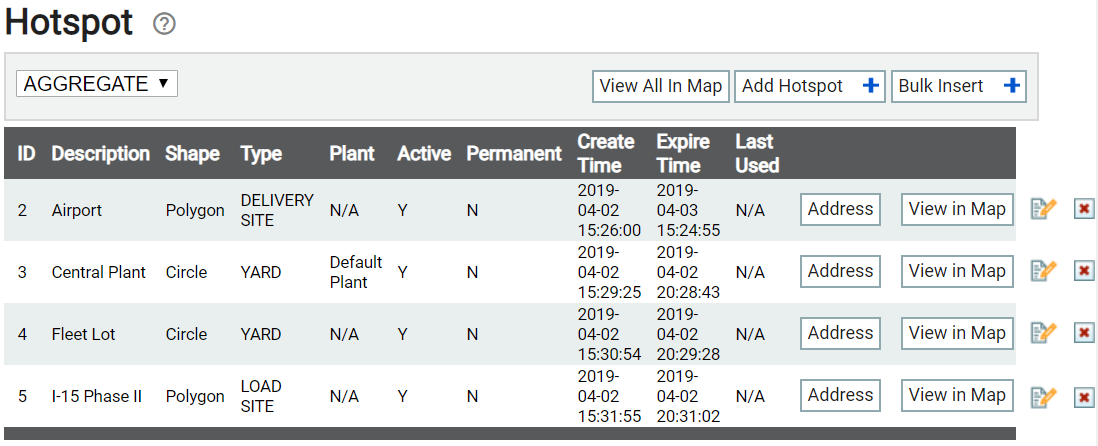
Settings > Hotspots & Regions > Hotspots
Individual hotspots may be created manually from this screen to create "geofences" around a location. Many companies use hotspots to create map locations for each plantA production plant or material storage location. at a company. In tandem with HotspotGeographic areas marked on a map that act as destinations for driver navigation or triggers for automated behaviors in TrackIt. Type settings, administrators may then set automatic statusThe specific activity or task a driver is currently engaged in, typically as part of a process called a "status loop." changes based on equipmentAll machines used as a means of production on a construction site or at a batch plant. entering and exiting the hotspot.
Because hotspots are integral to proper status flow, administrators have the option to restrict which users can alter hotspot permanency. Administrators can choose which users may Add, Edit, or Delete hotspots. For example, dispatchers may be permitted to alter temporary hotspots but restricted from altering permanent hotspots.
Add Hotspot dialog window
|
The name of the hotspot as it is will be identified in reports and the Equipment Map. |
|||||||
|
The design of the hotspot can take two shapes: Circle and Polygon. Circles center on coordinates specified when generating the geofenceGeographic areas marked on a map that act as destinations for driver navigation or triggers for automated behaviors in TrackIt., whereas polygons may be drawn in any shape the administrator wants on the Equipment MapA map view that tracks the locations and statuses of individual equipment in a fleet. The dispatcher's equivalent to a "bird's-eye view." for better accuracy. |
|||||||
|
The desired Hotspot Type. This categorizes each hotspot created and affects status changes as configured from the Hotspot Type screen. |
|||||||
|
The size of the hotspot across its diameter, either in yards or meters. |
|||||||
|
The GPS coordinates for the center of the hotspot, as specified by latitude and longitude. |
|||||||
|
The mailing address for the center of the hotspot. This street address is used to auto-populate the Latitude and Longitude fields. |
|||||||
|
The desired plant, if this hotspot is intended to indicate the location of a batching plant. This setting is also used in reports like Material Per Hour to determine which plant a driver is at based on their GPS coordinates in the hotspot. |
|||||||
|
The hotspot is flagged as Active and may be interacted with by any assigned equipment.
|
|||||||
|
When equipment enters the status that creates this hotspot, the geofence is designated as a permanent place of interest on the Equipment Map. We do not recommend setting job sites as permanent.
|
|||||||
|
If the Permanent option is deselected, then this field defines the exact time for when the hotspot is no longer active. The expiration time must be entered as: 2019-05-03 14:32:43 |


- Navigate to Settings > Hotspots & Regions > Hotspot.
- Click Add Hotspot
 .
. - Enter a Description label and select a hotspot Type.
- Set both the Shape and Size of the hotspot you're creating.
- Enter a Latitude and Longitude, or click Address Lookup
 to enter the mailing address.
 - If this hotspot indicates a plant location, click the Plant drop-down list and select the desired facility.
- Select Active to ensure the hotspot may be interacted with by equipment.
- Select Permanent if this hotspot should not disappear. Otherwise, enter an Expire Time. Depending on the hotspot type, use of the Remove auto-created hotspots each day option may override these configurations.
- Click Save
 .
.


- Navigate to Settings > Hotspots > Hotspots.
- Click the Bulk Insert
 button.
 - In the Bulk Insert dialog windowA pop-up window that requires user input., choose the Hotspot Type for the hotspots you want to add in bulk.
- Select the Active
 check box if the hotspots will need to interact with equipment immediately. You may leave this unchecked and edit each hotspot individually later.
 - Select the Permanent check box if the hotspots represent plant locations.
- Enter in addresses for each hotspot in the text window. Addresses must be on a separate line with a slash / between the address and hotspot description.

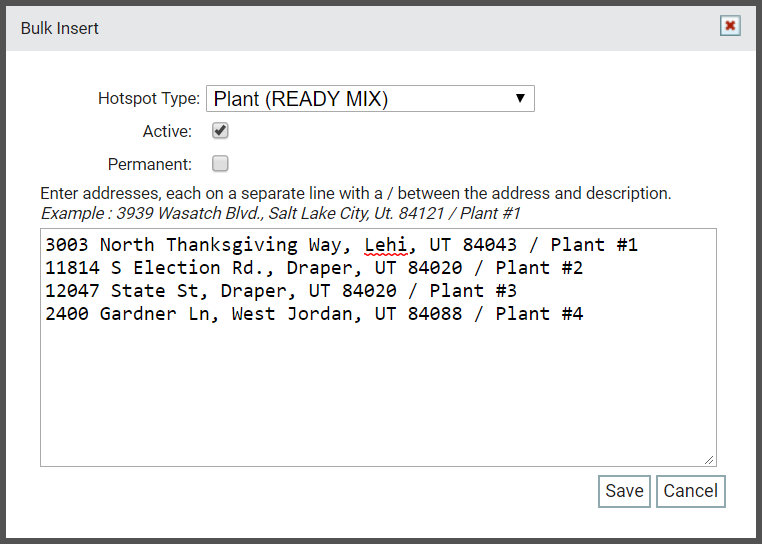
- Click Save.
- Navigate to Settings > Hotspots & Regions > Hotspot.
- Click the View All in Map
 button. The Equipment Map screen loads.
 - Right-click on the desired section of the map and click CREATE A HOTSPOT
 .
. - Left-click on an area of the map to designate as the center of the hotspot. The boundaries of the geofence can be changed at a later point, so this is not a permanent action.
- Provide a Description, Shape, Type, and Size.
- Click Save .

To change a hotspot to a polygon shape
- Click on the icon indicating the center of the hotspot, and then click EDIT
 .
. - Select the Shape drop-down menu and pick Polygon.
- Click Save .
- Click on the hotspot's center icon again and this time select ADJUST SHAPE
 .
. - Click and drag the points at each corner to adjust the shape of the geofence. Click along the blue lines to add more points to manipulate.
- Once you're done adjusting the hotspot, click Save .