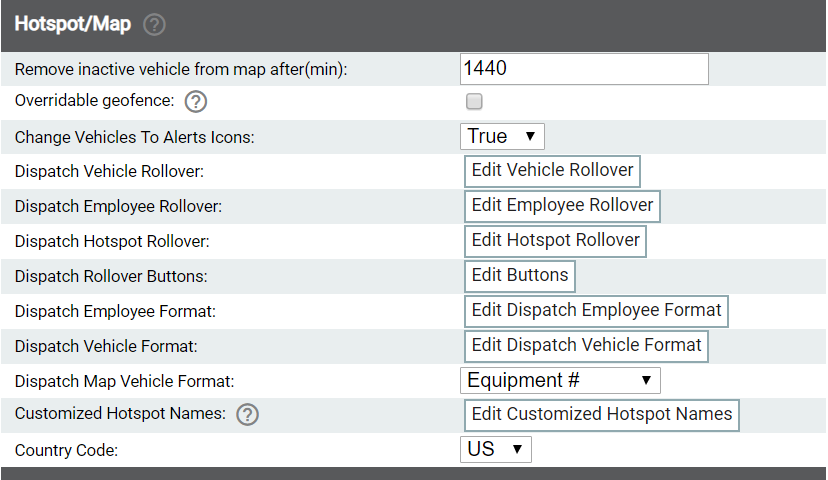
Settings > Site Settings > Hotspot/Map
Interactive elements accessible from dispatch screens are controlled here. This includes rollovers for hotspots, employees, and equipmentAll machines used as a means of production on a construction site or at a batch plant..
The values set here, whether custom or default, are viewable by clicking on or hovering over items like:
- EmployeeUser accounts for drivers, dispatchers, and other staff to perform varying functions in TrackIt. # or name
- Equipment #
- Hotspots
- Equipment icon
You may interact with rollovers on the Equipment Map, Dispatch View, and Equipment Map screens.
|
|
|
Remove Inactive Vehicle from Map After (min) |
This specifies how many minutes TrackIt should wait to receive a GPS location fix from a vehicleAll machines used as a means of production on a construction site or at a batch plant.. If no update to the GPS location is received prior to the threshold set here, then the vehicle is removed from the Equipment Map. When the vehicle resumes sending a GPS position, it appears on the map. If you have separate GPS and cellular antennae, then it is possible to still send data to TrackIt's servers without a GPS location fix.
By default, this is set to 60. Depending on the hardware a company uses, different behaviors occur at the end of a workday that may or may not affect TrackIt's ability to obtain a GPS fix:
|
|||
|---|---|---|---|---|
|
The enter and exit statusThe specific activity or task a driver is currently engaged in, typically as part of a process called a "status loop." changes for all hotspotGeographic areas marked on a map that act as destinations for driver navigation or triggers for automated behaviors in TrackIt. types are ignored and the current status for a vehicle is preserved. Without this option enabled, elapsed enter or exit delays revert the vehicle status to the predefined status of the hotspot type. This option useful if you expect your drivers to manage their statuses manually. You must specify an delay time for a hotspot type to force an override. At Plant A, the Exit Status for its hotspot is set to Depart Yard. A vehicle leaves the hotspot boundary and the driver manually changes their status to To Job.
|
||||
|
Change Vehicles to Alerts Icons |
When important, critical, or informational events trigger for a vehicle, the equipment icon is replaced with another icon to visually represent the active alertA software-generated message or warning triggered by vehicle data..
By default, this option is set to True. Selecting False disables this behavior. After addressing the eventEngine data recorded by TrackIt that includes fault codes and driver behaviors like hard braking., you must acknowledge the alert to remove the alert icon.
Once acknowledged, the alert icon is replaced once more with the equipment icon. |
|||
|
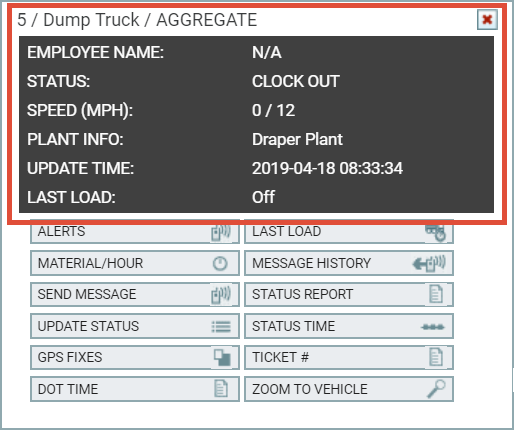
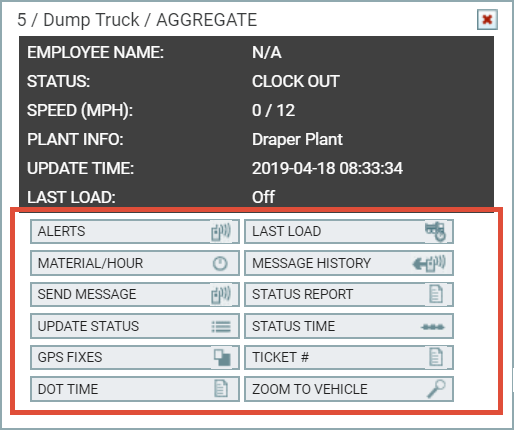
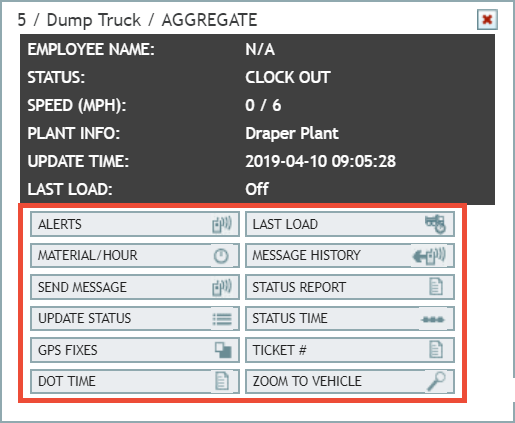
When tracking vehiclesAll machines used as a means of production on a construction site or at a batch plant. from the Equipment Map or Equipment Map screens, clicking on the equipment icon or vehicle number displays a list of details.
Some of this information is obtained through a supported onboard computer (OBC) (OBC) or engine data controller (EDC) connected to the vehicle's electronic control unitAlso known as an engine control module, this device controls engine performance by monitoring data reported by myriad built-in sensors. This data is interpreted by the ECU and then relayed to engine diagnostic hardware, such as an OBC or EDC. (ECUAlso known as an engine control module, this device controls engine performance by monitoring data reported by myriad built-in sensors. This data is interpreted by the ECU and then relayed to engine diagnostic hardware, such as an OBC or EDC.), whereas other details are generated through integrated third-party solutions. The rollover may be changed by clicking the Edit Vehicle Rollover button and then interacting with the pop-up dialog. |
||||
|
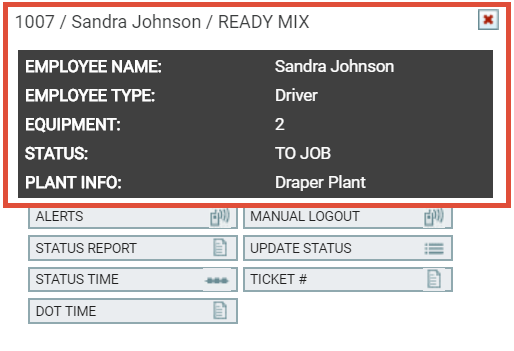
When tracking employee jobA project that orders and tickets are grouped under. statuses from the Dispatch View screen, clicking on the employee number displays a rollover with any attributes being tracked. This most commonly includes details like their name, job role or type, and assigned equipment.
The rollover may be changed by clicking the Edit Employee Rollover button and then interacting with the pop-up dialog. |
||||
|
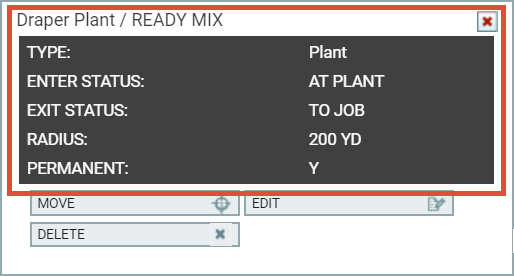
When a hotspot is set up from the Hotspots & Regions screen, the rollover displays details relevant to the hotspot's type. By default, the Edit Hotspot Rollover dialog window will display enter and exit statuses, radius, and hotspot types.
The rollover may be changed by clicking the Edit Hotspot Rollover button and then interacting with the pop-up dialog. |
||||
|
Altering rollover buttons for equipment allows you to specify what quick action buttons to display for easy access to items like reports regarding a vehicle's messageText messages exchanged between drivers and dispatchers using TrackIt. history or manual interactions like updating a status.
These rollover buttons may be changed by clicking Edit Buttons and then interacting with the pop-up dialog. After saving, your changes will be viewable from the Equipment Map or Dispatch View screens by selecting a vehicle or equipment number. |
||||
|
The Dispatch View screen identifies and sorts employees based on the attribute selected here. By default, Employee Name (First Last) is the set attribute. You may also pick alternate formats for names or Employee #. |
||||
|
The Dispatch View screen identifies and sorts vehicles based on the attribute selected here. While Equipment # is the most common value used, you may also identify vehicles by Vehicle Description and Vehicle Interface #. |
||||
|
The Dispatch View screen and Equipment Map panel on the Equipment MapA map view that tracks the locations and statuses of individual equipment in a fleet. The dispatcher's equivalent to a "bird's-eye view." identify vehicles based on the attribute selected here. While Equipment # is the most common value used, you may also identify vehicles by Vehicle Description and Vehicle Interface #. |
||||
|
To facilitate the automatic generation of hotspot names for status and ticketShort for “delivery ticket,” which is printed and given to the driver. Also called a tag or docket. The ticket includes, at a minimum, the product(s) ordered and the delivery address. It can also include the amounts of materials batched to form the mix. In the past, producers sent copies of the delivery ticket with prices as invoices; now tickets and invoices are two separate documents. hotspots, the Edit Customized Hotspot Names dialog window sets the naming standard according to ticket data, dispatch data, or default data. If you deselect Use System Default, TrackIt will check for values first in the Ticket # field, followed by Dispatch and Default. If no custom values are found, then the default attributes are used. |


Editing vehicle, employee, or hotspot rollovers
During the initial site setup process, each rollover type comes preassigned with a series of default attributes that you may customize further as needed. Should you want to change the attributes shown, take note that the attributes available are dependent upon the rollover type being edited. For example, the Vehicle Dispatch Rollover uses attributes like Employee # and Last Load, but not Hotspot ID or Hotspot Type.
The Edit Rollover dialog window allows you to directly change what data is shown for each rollover type.
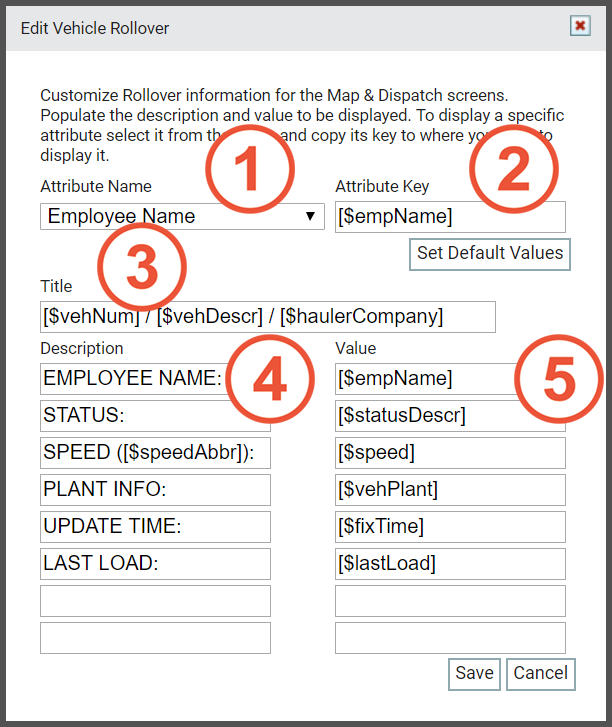
- Attribute Name. The predefined label associated with the attribute key. Selecting this will cause the associated shortcode to appear in the Attribute Key field.
- Attribute Key. The shortcode that TrackIt uses to identify and pull data for the rollover. After selecting an Attribute Name, the value shown in this field can then be copied and pasted to the Title or Value fields. These attributes should not be changed.
- Title. The label(s) that identifies the equipment, employee, or hotspot for ease of tracking. This consists of one or more shortcodes placed side-by-side and separated by a
/. - Description. The field label identifying the type of information displayed for the associated value. This may be customized as needed.
- Value. The shortcode that specifies what data type to track and display on the rollover.

- Navigate to Settings > Site Settings > Hotspot/Map.
- Click on the Edit Vehicle Rollover
 , Edit Employee Rollover
  , or Edit Hotspot Rollover
  button.
 - From the Edit Rollover dialog window, delete any attributes you do not wish to use.
- To add a new attribute, click the Attribute Name drop-down menu.
- Click the attribute you wish to use. The Attribute Key appears, which you can then copy and paste to the desired field below. These attributes may be used in the Title, Description, and Value fields. A full list of attributes may be found below these instructions.
- For the Title field, include attributes that help identify the rollover entity. For example:


[$vehNum] / [$vehDescr] / [$statusType]
- Enter the labels in the Description field that you wish to use for each selected Value.
- Once all desired attributes are specified, click Save
 . Visit your dispatch screen to see the data associated with these attributes in your rollovers.

The changes will take effect immediately and display the data reported for each attribute in the associated rollover. Data types not currently tracked or attribute keys mistyped will leave a blank value in the rollover.
With the Edit Rollover dialog windows, you can specify what information to display regarding your vehicles, employees, and hotspots from the Equipment Map or Dispatch View screens.
| Attribute Name | Attribute Key |
|---|---|
|
Alternate Work # |
[$altWorkNum] |
|
Bill of Lading (BOL) |
[$bol] |
|
Current/Max Speed |
[$Toospeed] |
|
Current Speed |
[$currSpeed] |
|
[$customerCode] |
|
|
Customer Name |
[$customerName] |
|
DestinationThe location of a job or pour site that a driver must navigate to. Address 1 |
[$destAddress1] |
|
Destination Address 2 |
[$destAddress2] |
|
Destination City |
[$destCity] |
|
Destination Description |
[$destDescr] |
|
Destination Key |
[$destKey] |
|
Destination PlantA production plant or material storage location. |
[$destPlant] |
|
Destination State |
[$destState] |
|
Destination Time |
[$destTime] |
|
Destination Zip |
[$destZip] |
|
Dispatch Sequence |
[$dispatchSequence] |
|
Driver Tag |
[$driverTag] |
|
Employee # |
[$empNum] |
|
Employee First Name |
[$empFirst] |
|
Employee Last Name |
[$empLast] |
|
Employee Name |
[$empName] |
|
Employee Type |
[$empType] |
|
Equipment # |
[$vehNum] |
|
Fix Time |
[$fixTime] |
|
Gross Weight |
[$grossWeight] |
|
Haul Phase |
[$haulPhase] |
|
Hired Hauler Company |
[$haulerCompany] |
|
Hotspot Create Time |
[$hotspotCreate] |
|
Hotspot Description |
[$hotspotDescr] |
|
Hotspot Enter Status |
[$hotspotEnter] |
|
Hotspot Exit Status |
[$hotspotExit] |
|
Hotspot Expire Time |
[$hotspotExpire] |
|
Hotspot ID |
[$hotspotId] |
|
Hotspot Permanent |
[$hotspotPerm] |
|
Hotspot Radius |
[$hotspotRadius] |
|
Hotspot Status Type |
[$hotspotStatusType] |
|
Hotspot Type |
[$hotspotType] |
|
Hotspot Used Time |
[$hotspotUsed] |
|
Hotspot Valid Vehicles |
[$hotspotValidVeh] |
|
Last LoadThe total amount of concrete or asphalt that is being or has been batched for delivery. |
[$lastLoad] |
|
Last Plant (Vehicle) |
[$vehLastPlant] |
|
Job # |
[$jobNum] |
|
Job Code |
[$jobCode] |
|
Job Contact Information |
[$jobContactInfo] |
|
Job Description |
[$jobDescr] |
|
Material Left On |
[$matLeft] |
|
Material Phase |
[$materialPhase] |
|
Max Speed |
[$maxSpeed] |
|
Net Weight |
[$netWeight] |
|
[$orderNum] |
|
|
[$originAddress1] |
|
|
[$originAddress2] |
|
|
Origin City |
[$originCity] |
|
Origin Description |
[$originDescr] |
|
[$originPlant] |
|
|
Origin State |
[$originState] |
|
Origin Time |
[$originTime] |
|
Origin Zip |
[$originZip] |
|
Phase Code |
[$phaseCode] |
|
Phone # |
[$phoneNum] |
|
Phone Description |
[$phoneDescr] |
|
Phone Direct Connect |
[$phoneDC] |
|
Plant (Employee) |
[$empPlant] |
|
Plant (Vehicle) |
[$vehPlant] |
|
PO Number |
[$productOrderNum] |
|
ProbeA probe device mounted in the side of a bin to measure the moisture content of aggregate materials such as sand. Battery Status |
[$probeBatteryStatus] |
|
[$probeCement] |
|
|
Probe Concrete Temperature |
[$probeConcreteTemperature] |
|
Probe Diagnostic Code |
[$probeDiagnosticCode] |
|
Probe Drum Direction |
[$probeDrumDirection] |
|
Probe Drum Negative Turns |
[$probeDrumNegativeTurns] |
|
Probe Drum Positive Turns |
[$probeDrumPositiveTurns] |
|
Probe Drum Speed |
[$probeDrumSpeed] |
|
Probe Drum Volume Ratio |
[$probeDrumVolumeRatio] |
|
Probe Drum Total Turns |
[$probeDrumTotalTurns] |
|
Probe Drum Tilt |
[$probeDrumTilt] |
|
Probe Drum Volume |
[$probeDrumVolume] |
|
Probe Measurement Index |
[$probeMeasurementIndex] |
|
Probe Pressure |
[$probePressure] |
| Probe Sleep Position | [$probeSleepPosition] |
| Probe SlumpSlump is defined as the number of inches (or millimeters) concrete will sag, or slump, when a special test cone filled with the concrete is turned upside down and the cone pulled off the concrete. In other markets this is called ‘consistency’. Consistency for concrete can be stated different ways. Examples are: slump, flow, workability. We mostly use ‘slump’. | [$probeSlump] |
| Probe Solar Status | [$probeSolarStatus] |
| Probe ViscosityA concrete's resistance to flow under external stress. | [$probeViscosity] |
| Probe Unloading Rate | [$probeUnloadingRate] |
| Probe Water | [$probeWater] |
| Probe Water Added | [$probeWaterAdded] |
| Probe Water Cement Ratio | [$probeWaterCementRatio] |
| Probe Water Source | [$probeWaterSource] |
| Probe Yield | [$probeYield] |
|
Product Amount |
[$productAmt] |
|
Product Code |
[$productCode] |
|
Product Code & Amount |
[$productCodeAmt] |
|
Product Description |
[$productDescr] |
|
Product Description & Amount |
[$productDescrAmt] |
|
Product Description, Code & Amount |
[$productDescrCodeAmt] |
|
Return Address 1 |
[$returnAddress1] |
|
Return Address 2 |
[$returnAddress2] |
|
Return City |
[$returnCity] |
|
Return Description |
[$returnDescr] |
|
Return Plant |
[$returnPlant] |
|
Return State |
[$returnState] |
|
Return Time |
[$returnTime] |
|
Return Zip |
[$returnZip] |
|
Speed Abbreviation |
[$speedAbbr] |
|
Status # |
[$statusNum] |
|
Status Description |
[$statusDescr] |
|
Status Time |
[$statusTime] |
|
Status Type |
[$statusType] |
|
Tare Weight |
[$tareWeight] |
|
Target Slump |
[$slumpTarget] |
|
Trailer Number |
[$trailerNum] |
|
Vehicle Description |
[$vehDescr] |
|
Vehicle Interface # |
[$vehIntNum] |
| Water Allowed | [$probeWaterAllowed] |
| Water Extra | [$probeWaterExtra] |
|
Weight Tag |
[$weightTag] |
|
Work # |
[$workNum] |
|
Work Comment |
[$workComment] |
Editing equipment rollover buttons
With the Edit Buttons dialog window, you can specify what quick action buttons to associate with your vehicle rollovers for easy access to items like reports regarding your vehicle's message history or manual interactions like updating a status. These buttons are viewable from the Equipment Map or Dispatch View screens by selecting a vehicle or vehicle name.
While default information is provided for users, attributes can be added or edited as desired.
- Navigate to Settings > Site Settings > Hotspot/Map.
- Click on the Edit Buttons
 button.
 - From the Edit Buttons dialog window, click on the button name and then the left arrow button between button panes.
- To add a button, click on the button name and then the right arrow button.

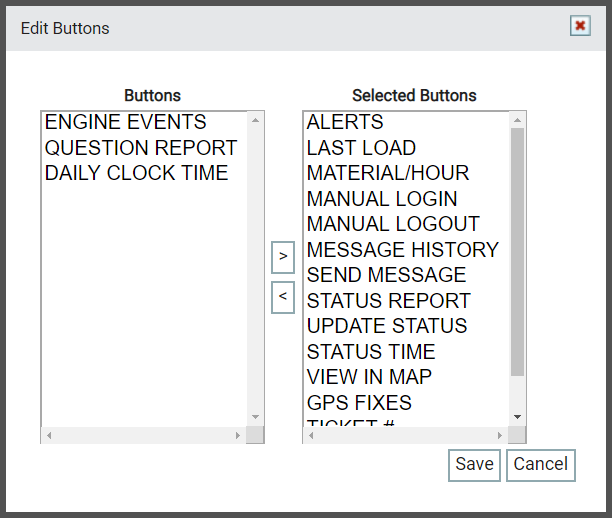
- Once all desired buttons are in use, click Save .
The changes will take effect immediately. Upon visiting the associated dispatch screens, your rollovers will now include the buttons selected here.
In addition to equipment data, the equipment dialog window displays rollover buttons. Each button allows you to perform quick actions, view condensed reports, or interact with drivers.
The information displayed for each vehicle rollover button is described briefly below.
| Button Name | Button Description |
|---|---|
| Alerts | Displays all alerts triggered by this vehicle or employee. |
| Daily Clock Time | Displays the Daily Clock Time Report with hours an employee has clocked for that day. |
| DOT Time | Displays a small report indicating the number of hours spent driving that will be reported for DOT purposes, similar to the Hours of Service report. |
| Engine Events | Displays a small report of engine events reported for that employee or equipment. Each occurrenceA single incident or event recorded by TrackIt. has details listed like the Engine EventEngine data recorded by TrackIt that includes fault codes and driver behaviors like hard braking. Breakdown report. |
| GPS Fixes | Launches the GPS Fixes report to play portions of a drivers day, and shows users a recording of the driver as they move around the map. |
| Last Load | Alerts drivers that they are on their last load of the day. This automatically sets a timer once the driver enters an At Plant or At Yard status. |
| Manual Login | Performs a log in action without any interaction needed from the TrackIt Android app. |
| Manual Logout | Forces the log out action on a driver's tablet without any interaction needed from the TrackIt Android app. |
| Material/Hour | Displays a small report for the equipment identifying the total number of trips, material carried per trip, and material divided by the amount of time, similar to the Material Per Hour report. |
| Message History | Displays a brief history of messagesText messages exchanged between drivers and dispatchers using TrackIt. sent between this driver and dispatch, similar to the Message History report. This includes who sent the message, what status they were in, and timestamps for when the message was sent and received. |
| Question Report | Displays a small report with all questions sent to a driver and the responses they returned. |
| Send Message |
Displays a simple dialog window to create a Text, Canned, or Question message and send it to that employee or equipment specifically. Create Canned messages from the Messages page. |
| Status Report | Displays a condensed Status Breakdown report to show the each status the selected employee or equipment has been in throughout the day and how much time they spent in each status. |
| Status Time | Displays a condensed Status Time Summary report breaking down each status the equipment or employee has entered, how many times they've been in that status, and then times in minutes that they've spent in that status. |
| Ticket # | Shows all relevant ticket information regarding the selected employee or equipment. From this dialog window, you can manually change tickets, end a ticket if unplanned changes occur, and edit destination hotspots if necessary. Editing a destination will affect all other tickets associated with that job. |
| Update Status | Displays a dialog to manually update the status of a driver or equipment. |
| View in Map | Launches the Equipment Map screen on a separate browser tab. This button is only viewable on the Equipment Dispatch screen. |