Once statuses have been properly configured and employees are added, you can move on to adding equipmentAll machines used as a means of production on a construction site or at a batch plant.. Properly adding equipment enhances your ability to manage and maintain your fleet with TrackIt. Equipment is best added when the following steps are completed in sequence:
- Add a plantA production plant or material storage location.
- Add an equipment type
- Add equipment
- Upload/import an equipment list
- Complete an equipment bulk update
- Create an equipment group
1. Add a plant
Equipment is typically associated with the plants at which they are maintained, loaded, dispatched, etc. Before adding equipment types and equipment, plants should be set up so equipment may be properly assigned to the right plant for dispatching, payroll, and reporting.
- From the TrackIt Web Console, navigate to Settings > Plant.
- Click Add New Plant
 .
.

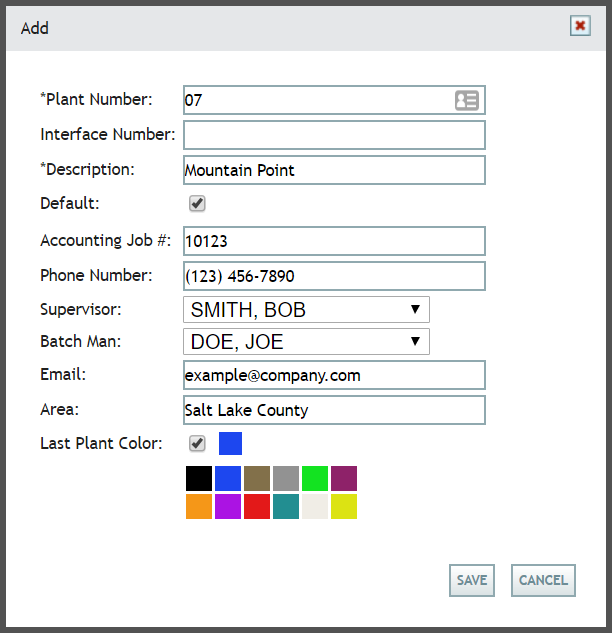
- Provide a Plant Number and Description. Add any other details as needed, such as an Interface Number, Phone Number, and Supervisor.
- Click Save
 .
.

Other components of TrackIt may now be assigned to this plant, such as Equipment or a Hotspot.
2. Add an equipment type
Before adding individual equipment, you must add equipment types. You can categorize equipment by purpose, engine configuration, and home plant location, as well as assign equipment type icons for easy identification on the Equipment Map. Additionally, equipment type is associated with a statusThe specific activity or task a driver is currently engaged in, typically as part of a process called a "status loop." type. Each type of equipment typically has its own status workflow and must be assigned the correct status type, such as ready mix and bulk haulers.

- Navigate to Settings > Equipment > Equipment Type.
- Click Add Equipment Type
 on the right.
 - On the Add Equipment Type dialog screen, select and enter the desired information for the equipment type. This will most likely include the Description, as well as the required vehicleAll machines used as a means of production on a construction site or at a batch plant. icon and To create a status type.
- Select the Save button to finish adding your equipment type.
- To edit an equipment type, click Edit Equipment Type
 and follow the relevant steps above.


3. Add equipment
With each piece of equipment you add, you can include specific details about the vehicle's model and identification. Each vehicle is assigned a type and licenses, configurations that will determine the features and statuses available to employees using that specific vehicle.
- Navigate to Settings > Equipment > Equipment.
- Select the Add Equipment
 button on the right.
 - On the Add Equipment dialog screen, enter in the desired information on the Data tab.
- On the Licenses tab, select
 the desired licenses you wish to assign to the vehicle.
 - If you are a COMMANDassurance customer, select the ProbeA probe device mounted in the side of a bin to measure the moisture content of aggregate materials such as sand. license to activate the Sensor tab.
- If you are a TrackIt Delivery Cycle Monitoring customer, select the Delivery Cycle Monitoring license to activate the Sensor tab.
- Enter information on the Sensor tab if applicable.
- Click the Save button at the bottom to finish adding your equipment.


4. Import/upload an equipment list
To save time, you may add multiple vehiclesAll machines used as a means of production on a construction site or at a batch plant. at one time by uploading a properly-formatted CSV file. The information and instructions below detail how to properly upload a CSV file.
Structuring column data for an import
Performing an upload entails that you use a properly-formatted CSV file. This file should consist of individual columns for each data type with each row containing the data for an individual vehicle entry.
| Example equipment import file |
Each column should be labeled based on the following drop-down values.
| Column Name | Example Data | Required? |
|---|---|---|
| Equipment Number |
1007 |
Yes |
| Equipment Interface Number |
007 |
|
| Equipment Description | TruckAll machines used as a means of production on a construction site or at a batch plant. 1007 | Yes |
| DOT and DVIR Vehicle ID | 539 | |
| ISE Asset Type | Vehicle | |
| Make | Mack | |
| Model | GU813 | |
| Year | 2015 | |
| Equipment Type | Rear Discharge | Yes |
| Home Plant Number | 3 | |
| Home Plant Description | Default Plant | Yes |
| Last Plant Number | 1 | |
| Last Plant Description | Draper Plant | |
| Pre/Post Trip from Engine | Enabled | |
| SPN Specified Source | JDual | |
| Probe Drum Type | Standard | |
| Flow Meter Volume Per Pulse | 1 | |
| Water Units | Liters | |
| Probe Serial Number | 160000-0150 | |
| Probe MAC Address | 00A050-BB0001 | |
| IO Box MAC Address | 00A050-AD0014 | |
| Comment | 1M3BX24D9GN138031 | |
| Last Login | 2018-12-06 10:05:05 |
- Navigate to Settings > Equipment > Equipment.
- Select the Upload CSV File
 button on the right.
 - Click Browse... to select the desired CSV file.
- Select the file to import and click Open.
- Click Upload to complete the import. If the upload was successful, a dialog windowA pop-up window that requires user input. appears to indicate its completion.
- Click OK to close the dialog. The equipment list updates with the newly-added vehicles.
5. Complete an equipment bulk update
Once you have added equipment, certain circumstances may require that you to update specific components on multiple vehicles at once. The bulk update functionality enables you to easily modify equipment all at once.
- Check the boxes next to each field you would like to change.
- Select or type the desired update from the drop-down menus or fields next to the field name.
- If you want to filterA search tool that restricts data queried based on factors like equipment type, employee groups, and date ranges. the equipment, choose an equipment type from the drop-down menu above the table.
- Use the check box at the top of the table to update all equipment in the list, or individually select equipment.
- Click Save
 to update the equipment.

6. Create an equipment group
Once vehicles have been added to the TrackIt Web Console, you may create equipment groups to aid in filtering vehicles and to further categorized equipment beyond equipment type, such as by plant.
- Click Add New Equipment Group
 .
. - Enter a Vehicle Group Name.

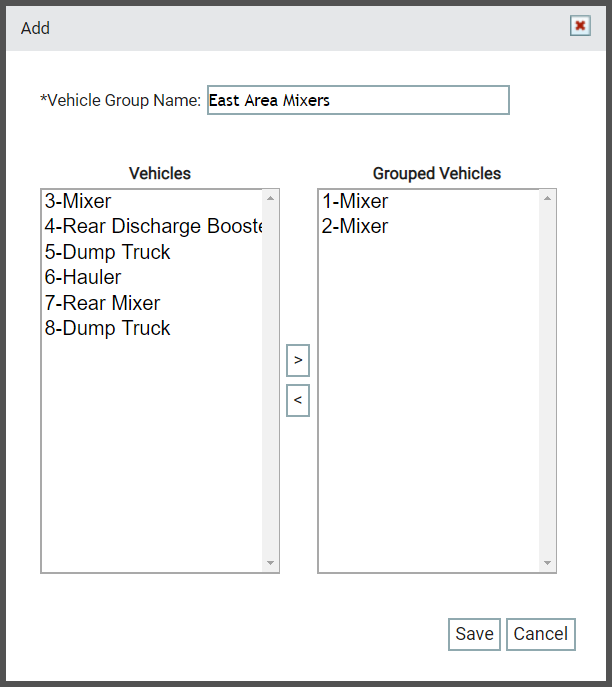
- From the Vehicles pane, select the desired individuals and click the Add to Group
 button to add them to the group.
 - To remove equipment, select names from the Grouped Vehicles pane and click the Remove from Group
 button.
 - Click Save .


You have successfully added equipment to TrackIt! You can proceed to Configuring permissions.
|
|
|
|