Hotspots or geofences are critical to the proper flow of statuses and equipmentAll machines used as a means of production on a construction site or at a batch plant. tracking. When hotspots are improperly created or changed, this can cost dispatchers and administrators unnecessary work and time. This guide covers the processes for adding hotspots in the TrackIt Web Console and best practices for using and adding hotspots to fully utilize this functionality in TrackIt.
Follow these steps in orderIndividual requests for specific materials that are associated with a job. Some jobs may consist of multiple orders of varying products. to properly set up hotspots:
- Add a new hotspotGeographic areas marked on a map that act as destinations for driver navigation or triggers for automated behaviors in TrackIt. type
- Add a new hotspot
- Add hotspots in bulk
- Create hotspot from the equipment mapA map view that tracks the locations and statuses of individual equipment in a fleet. The dispatcher's equivalent to a "bird's-eye view."
- Create hotspots from a ticketShort for “delivery ticket,” which is printed and given to the driver. Also called a tag or docket. The ticket includes, at a minimum, the product(s) ordered and the delivery address. It can also include the amounts of materials batched to form the mix. In the past, producers sent copies of the delivery ticket with prices as invoices; now tickets and invoices are two separate documents.
- Add a status hotspotHotspots automatically generated by a vehicle upon entering a status. The hotspot is centered on the tracking device's location.
1. Add a new hotspot type
Before adding any new hotspots each hotspot needs to be assigned a type. Each Hotspot Type is associated with a To create a status type, and each statusThe specific activity or task a driver is currently engaged in, typically as part of a process called a "status loop." type is associated with an Equipment Type. Tracking equipment accurately relies heavily on properly configured statuses and hotspots.

- Navigate to Settings > Hotspots & Regions > Hotspot Type.
- Click Add Hotspot Type
 .
. - Enter a Description and Radius.
- Pick a Status Type and then select both an Enter Status and Exist Status.
- Pick a time for the Enter Delay and Exit Delay.
- If this hotspot type is temporary, enter an Expiration After Minutes value or select Remove auto-created hotspots each day.
- Click Save
 .
.


You may now manually add hotspots.
2. Add a new hotspot
An individual hotspot associated with a hotspot type will be configured to interact with a specific equipment type and status type.
- Navigate to Settings > Hotspots & Regions > Hotspot.
- Click Add Hotspot
 .
. - Enter a Description label and select a hotspot Type.
- Set both the Shape and Size of the hotspot you're creating.
- Enter a Latitude and Longitude, or click Address Lookup
 to enter the mailing address.
 - If this hotspot indicates a plantA production plant or material storage location. location, click the Plant drop-down list and select the desired facility.
- Select Active to ensure the hotspot may be interacted with by equipment.
- Select Permanent if this hotspot should not disappear. Otherwise, enter an Expire Time. Depending on the hotspot type, use of the Remove auto-created hotspots each day option may override these configurations.
- Click Save .

3. Add hotspots in bulk
You may add multiple hotspots at one time, such as adding hotspots for plants or when adding jobA project that orders and tickets are grouped under. hotspots for the next day's job locations.
- Navigate to Settings > Hotspots > Hotspots.
- Click the Bulk Insert
 button.
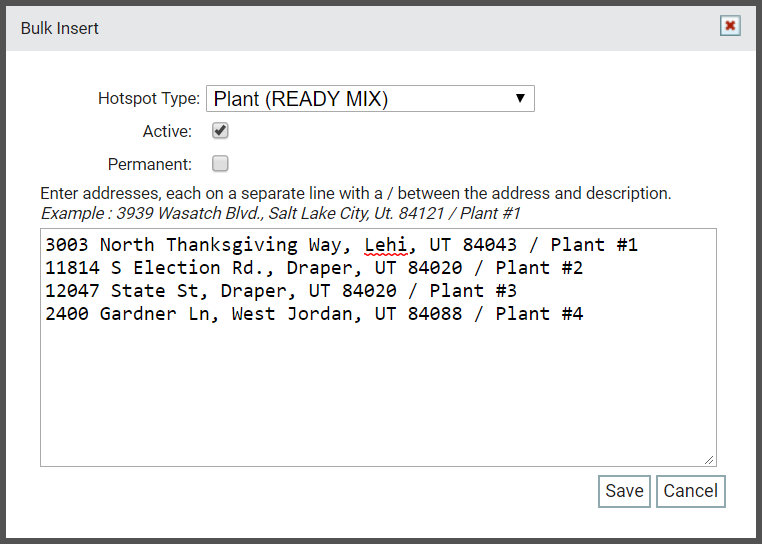
 - In the Bulk Insert dialog windowA pop-up window that requires user input., choose the Hotspot Type for the hotspots you want to add in bulk.
- Select the Active
 check box if the hotspots will need to interact with equipment immediately. You may leave this unchecked and edit each hotspot individually later.
 - Select the Permanent check box if the hotspots represent plant locations.
- Enter in addresses for each hotspot in the text window. Addresses must be on a separate line with a slash / between the address and hotspot description.


- Click Save .
4. Add hotspots from the equipment map
Sometimes hotspot maintenance is needed when a hotspot is placed incorrectly or isn't created. Creating a hotspot from the equipment map allows dispatchers to remain aware of equipment status and locations while also performing a critical task for proper workflow.
- Navigate to Settings > Hotspots & Regions > Hotspot.
- Click the View All in Map
 button. The Equipment Map screen loads.
 - Right-click on the desired section of the map and click CREATE A HOTSPOT
 .
. - Left-click on an area of the map to designate as the center of the hotspot. The boundaries of the geofenceGeographic areas marked on a map that act as destinations for driver navigation or triggers for automated behaviors in TrackIt. can be changed at a later point, so this is not a permanent action.
- Provide a Description, Shape, Type, and Size.
- Click Save .


To change a hotspot to a polygon shape
- Click on the icon indicating the center of the hotspot, and then click EDIT
 .
. - Select the Shape drop-down menu and pick Polygon.
- Click Save .
- Click on the hotspot's center icon again and this time select ADJUST SHAPE
 .
. - Click and drag the points at each corner to adjust the shape of the geofence. Click along the blue lines to add more points to manipulate.
- Once you're done adjusting the hotspot, click Save .


5. Add a hotspot with a ticket
Every time a destinationThe location of a job or pour site that a driver must navigate to. location is included when a ticket is created, a hotspot will be created at that hotspot. The hotspot will be automatically assigned the default hotspot type, so you may need to adjust the hotspot characteristics from the Equipment Map.
- Navigate to Dispatch > Ticket Management > Ticket.
- Select the Add Ticket
 button on the right.
 - Enter the relevant information in the General dialog screen.

 the ticket.
- Select Next
 to proceed to the following dialog screens.
 - Add valid addresses in the Origin and Destination dialog windows if applicable. This will allow TrackIt to add a hotspot at these locations using the default hotspot type.
- Enter in the desired information on each of the dialog screens. You have the option to leave the dialog screens empty as you go and Edit the ticket later.
- When you reach the dialog screen labeled Finish, click Save . A hotspot will be added at the OriginThe source or "home" location equipment departs from when en route to a destination. This is typically a plant or yard. and Destination locations when the ticket is marked as Active.

6. Add a status hotspot
With a status hotspot, you can configure TrackIt so that a hotspot is created once a driver enters a specific status. This is especially helpful if the first vehicleAll machines used as a means of production on a construction site or at a batch plant. to a job site creates the hotspot at the most exact location for pouring so future vehiclesAll machines used as a means of production on a construction site or at a batch plant. can use that hotspot. Sometimes, hotspots created from tickets provide inaccurate coordinates because the address for a job site is new or a close estimate. A status hotspot can provide a hotspot at the most correct coordinates if the driver triggers the correct status at the correct location.
- Navigate to Settings > Status > Status Hotspot.
- From the drop-down menu on the left, choose which equipment type you would like to add the hotspot to. This will ensure the correct status type appears in the Add dialog screen.
- Click Add New Hotspot Status Creation
 .
. - Choose the Status that will trigger the hotspot.
- In the next drop-down menu, choose the Hotspot Type.
- Select each desired check box for Permanent, Active, Create inside existing hotspot, and Roaming.
- Click Save .

You have successfully configured hotspots! Continue to Adding employees.
|
|
|
|