Adding an employeeUser accounts for drivers, dispatchers, and other staff to perform varying functions in TrackIt. with full functionality in the TrackIt Web Console involves multiple steps spanning different settings. To ensure all the correct prerequisites are in place, follow the steps below to add employees.
- Set up a plantA production plant or material storage location.
- Add an employee type
- Add an employee
- Set up an employee group
- Set up email groups
- Add employees as site users
1. Set up a plant
Employees are associated with plants when they are added, so it's best to ensure the proper plants are available before adding employees. Most commonly, employees are associated with specific plants for payroll purposes and because employees have specific roles at a plant.
- From the TrackIt Web Console, navigate to Settings > Plant.
- Click Add New Plant
 .
.

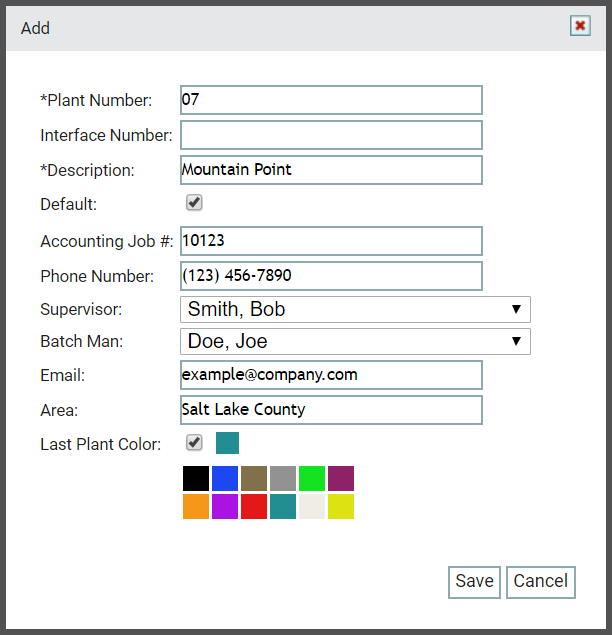
- Provide a Plant Number and Description. Add any other details as needed, such as an Interface Number, Phone Number, and Supervisor.
- Click Save
 .
.

Other components of TrackIt may now be assigned to this plant, such as Equipment or a Hotspot.
2. Add an employee type
Designating an employee type allows the employee to be categorized more easily for filtering and payroll purposes and is a prerequisite for adding individual employees. Employee types typically describe a jobA project that orders and tickets are grouped under. type, such as dispatcher, driver, or batcher. When Setting up payroll, the employee type is used to distinguish between certain job types for payroll practices.
- Navigate to Settings > Employee > Employee Type.
- Click the Add Employee Type
 button.
 - In the Add Employee Type dialogue window, enter data for Description, Require Schedule, Allow Early Login, Max Login Time, Pay To Schedule, Deduct Lunch, and Paid Holiday Hours.
- Complete any other desired fields.
- Click the Save button.

3. Add an employee
With a plant and employee type created, you can assign them to a plant and type and add more specific details about the individual employee. The employee's information will allow them to be identified in other areas of TrackIt, like Payroll, the Equipment Map, and on the TrackIt Android application.

- Navigate to Settings > Employee > Employee.
- Click Add New Employee
 . If you have a spreadsheet containing multiple employee entries, click the Upload CSV File
  button and browse for your file.
 - Enter any necessary information to give them access to TrackIt.

- Click Save .
The employee may now log in on the TrackIt Android app, TrackIt Web Console, or employee web portal depending on their Employee Type.
4. Add multiple employees
To save time, you can add more than one employee at a time if you upload a properly-formatted CSV file. The information and instructions below detail how to perform this process.
Structuring column data for an import
Performing a bulk upload entails that you use a properly-formatted CSV file. This file should consist of individual columns for each data type with each row containing the data for an individual employee entry.
| Example employee import file |
Each column should be labeled based on the following drop-down values.
| Column Name | Example Data |
|---|---|
| Employee Number |
1007 |
| Alt Employee Number |
007 |
| DOT and DVIR Driver ID | 137A |
| First Name | Jose |
| Last Name | Prada |
| Employee Type | Driver |
| Hire Date | 2016-08-09 |
| Acquired Hire Date | 2018-06-13 |
| Plant Number | 2018-11-27 |
| Plant Description | Default Plant |
| Phone 1 | (678) 901-2345 |
| Phone 2 | (678) 901-2345 |
| jprada@examplereadymix.com | |
| Last Login | 2019-07-15 09:38:31 |
- Navigate to Settings > Employee > Employee.
- Select the Upload CSV File button on the right.
- Click Browse... to select the desired CSV file.
- Select the file to import and click Open.
- Click Upload to complete the import. If the upload was successful, a dialog windowA pop-up window that requires user input. appears to indicate its completion.
- Click OK to close the dialog. The employee list updates with the newly-added records.
5. Set up an employee group
You can group employees beyond employee type by adding them to employee groups. This is especially useful for grouping employees by shift and plant when certain messagesText messages exchanged between drivers and dispatchers using TrackIt. need to be relayed to specific groups. Creating an employee group is also a prerequisite for setting up email groups that target employees.
- Navigate to Settings > Employee > Employee Group.
- Click Add New Employee Group
 .
. - Enter an Employee Group Name.

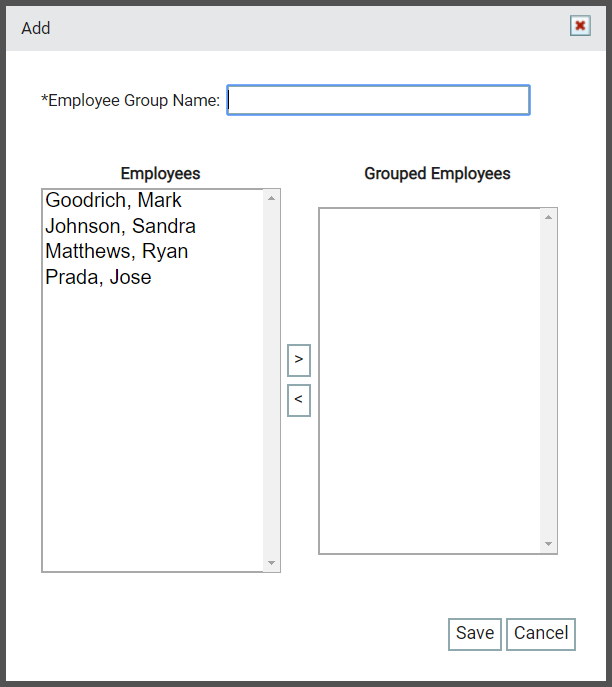
- From the Employees pane, select the desired individuals and click the Add to Group
 button to add them to the group.
 - To remove employees, select names from the Grouped Employees pane and click the Remove from Group
 button.
 - Click Save .


6. Set up an email group
With employees added, you are ready to set up correspondence channels with the employees. When events occur that are relevant to a specific group of employees, an email group makes it easier to contact all the correct members at the same time. Email groups can also be configured to target equipmentAll machines used as a means of production on a construction site or at a batch plant. types, plants, and groups.
- Navigate to Settings > Email Groups.
- Click on Email Group
 to launch the Email Group dialog window.
 - Enter in a Group Name.
- Select the desired group from Employee Groups. If applicable, select the desired items from the following drop-down menus.
- Click Save .

You have successfully added an employee! We recommend Adding equipment next.
|
|
|
|